Your cart is currently empty!
Making flower bombs
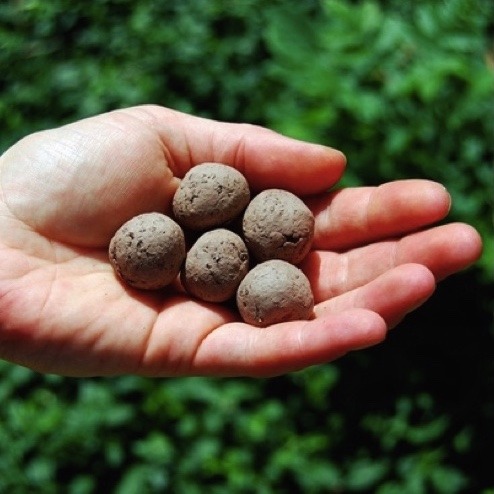
A flower bomb is a package of flower seeds, protected by clay and compost. Many people also call such a package a seed bomb. They are small round balls with the potential to surprise people by growing dozens of flowers. You put the balls in your jacket pocket and they are comfortable to hold. Ideal to have some Guerrilla Gardening with you. You can easily throw them past a (construction) fence to a place that is otherwise inaccessible.
Step 1: Collect the ingredients
Needed for 10 flower bombs:
- 8 tablespoons of clay (bentonite for quick casting, red clay for storage)
- 10 tablespoons of compost (or potting soil)
- Two teaspoons of chili powder (optional)
- Flower seeds (large seeds: two teaspoons / small seeds: half a teaspoon).
Step 2: Get other stuff ready
What else you need:
- A bowl
- A spoon to stir with
- Water (little, you don’t need more than 50 ml)
- An empty egg carton
Step 3: Mix
Mix all the dry ingredients together in the bowl. Then slowly add water drop by drop. Keep stirring until you notice your mixture sticking together. Don’t get it too wet!
Step 4: Roll
Shape your mixture into balls of about 3 cm in diameter. With the above quantities you can roll about 10. Some Guerrilla Gardeners find it useful to flatten the ball a little bit afterwards so that it becomes a flying saucer. As a result, it will remain better at the destination later. If you have small seeds, make smaller bombs. If you make them about 2 cm in size, you can make 20 with the above quantities.
Step 5: Drying & Storing
You can keep your balls well protected in the egg carton. For example, if you want to take them with you in your jacket pocket, it is useful if they feel dry. Then let them dry in the dark (!) for at least 3 days.
Each type of seed needs different conditions to germinate. Some seeds need cold and others need heat, some seeds need light and others need dark. Because you often use a seed mixture, it is possible that certain seeds will germinate while the bombs are drying. That doesn’t look as nice, but you can still use them. The longer you keep the seed bombs, the less viable they become.
Step 6: flower bomb – sea of flowers
And now on to that place in your neighborhood that could use some flowers! You prefer to choose a spot with a reasonable amount of sun.
Bring water to give the bombs a fresh start. You prefer to water your bombs regularly afterwards.
If you cannot reach the spot yourself, preferably go on a rainy day so that the seeds immediately get a splash of water.

Extra info flower bombs:
The clay
- If you want to throw out the flower bombs quickly, it is best to use bentonite. You can buy this at (online) dealers for potters. But you can also buy it in some garden centers.
- Red (or white) clay. This is a smooth type of clay that you can easily work with. The seed bombs come out a little more difficult, they are a bit firmer. This type of clay is suitable if you want to keep the bombs a little longer.
- In addition to dried clay, you can also use ‘wet’ clay. These can be found, for example, in fens with a clay bottom.
The compost
This is ordinary ‘home garden and kitchen compost’. You can also add other organic material. For example, the coconut fiber or potting soil. Preferably do not buy potting soil for which peat has been chipped – ‘old’ potting soil that you have left over from a dead plant also works fine. You can even add tea leaves!
Seeds
This is of course the point. The choice of your seeds determines what your sea of flowers will look like. Choose the seeds that match where you want to throw the bomb.
- Flower bombs in front of and wasteland. Plants that germinate quickly and continue to grow well fit here. For example, poppy, cornflower, chamomile.
- Flower bombs for happy bees. Preferably choose native species that are native to the area. For example for yarrow, clover, dead nettle, carrot, field clock.